

Unified Service Desk (USD) for Microsoft Dynamics CRM contains a comprehensive agent scripting capability, something I have blogged about several times before. In this post I’d like to cover some new concepts, including the concept of “AllAnswersVisited“.
Let’s assume that whenever a contact calls the first task an agent must complete is to confirm they are talking to the correct person. This might involve confirming someone’s name, date of birth and postcode. (for example.)
In this example I will show you how to create an agent script to support this verification process and to only continue to the next script if all the answers have been confirmed.
I’m going to assume you already have a reasonable understanding of USD and agent scripting. Sorry!
The steps involved are;
- Create an agent script for handling queries from contacts.
- Create an agent script to verify who the contact is.
- Create some actions.
- “Fire” contact verification script on load of contact.
- “Fire” contact queries agent script on completion of the contact verification script.
Step One – Create an agent script for handling queries from contacts.
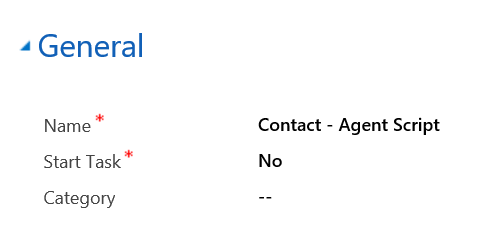
I’m not going to cover this step in detail! I’m kind of assuming you already have an agent script working for your contacts. I have an agent script called “Contact – Agent Script”. This contains multiple answers to support creating cases, opportunities, updating notes, sending emails etc.
All of this is great BUT I don’t want the agent to be tempted to do any of these things until we have confirmed who we are speaking with!

Step Two – Create an agent script to verify who the contact is
So next I created an agent script to support the verification process. In my sample process I have decided that a contact must always confirm their name, date of birth and postcode. A pretty typical set of data but you may wish to adjust the options based on whatever verification process is required.
I created the agent script shown below called “Contact Verification Agent Script”.

I then added three answers to my script, “Confirm Contact Name”, “Confirm Date of Birth” and “Confirm Postcode”.
My “Confirm Contact Name” answer looked like this …. Notice that the answer text contains [[contact.fullname]]. This is so that the contains name is inserted into the agents script, hopefully making their life easy!

My confirm postcode answer was pretty must the same, I just used a different replacement parameter.
My confirm date of birth answer looked like this. This time notice that I have added [[$Scriptlet.ParseDOB]] to the answer text. This was because I wanted to format the date returned by [[contact.birthdate]]. Hence I created a scriptlet called “ParseDOB” to return the date in a format I liked.

I’m not going to cover the scriptlet concept in detail here. You could make the solution simpler by just replacing [[$Scriptlet.ParseDOB]] with [[contact.birthdate]]. But if you’d like to “play” around with the scriptlet idea, I have shown mine below. (It is just a simple piece of javascript to format a date, I’m sure you could do better!!)

Step Three – Create some actions.
Ok, now you have a couple of scripts you’ll need some actions that will be used to trigger these scripts. I actually had three!
- One is used to trigger the contact verification script when an existing contact is loaded.
- Another is used to trigger the main contact agent script after the verification has been completed.
- A third is needed (if) your agents have the ability to create new contacts. As you can’t verify a new contact against their existing data! In my simple example I simply called the existing contact agent script. You could get more creative and have a third script which covers specific questions for creating a new customer.
Action One – Contact Verification
Below you can see my action to call the contact verification agent script.
The hosted control is “Agent Scripting”, I’m assuming you already have an agent scripting hosted control defined!
My action is “GotoTask” and then the data portion contains the name of the script for contact verification. So in my example “Contact Verification Agent Script”.

I then added a condition to the script, this is very important! My verification script only makes sense for existing contacts. So I added a condition that says “[[contact.Id]]”!=””, as new contacts have a blank Id until they are saved. Meaning this script is only triggered when an existing contact is loaded.

Action Two – Trigger “main” contact agent script
This action looks very similar to the first one! The hosted contrrol is Agent Scripting again and my action is GotoTask again. But this time I have set the data portion to my main agent script. In my example I called it “Contact – Agent Script”

Another important condition is added to this script. This time “[[task]]”==”Contact Verification Agent Script”.
When I call this action [[task]] will contain the name of the script the action is called from. As I only want this process to be triggered for contact verification my task will name to be “Contact Verification Agent Script”. (The name of the script we are using to verify the contact.)
This condition is important if you have multiple other scripts!

Action Three – Trigger “main” contact agent script for new contacts
Finally, I needed a third action that will trigger the script I want to run for new contacts. My action is pretty straight forward. The hosted control is again “Agent Scripting” and the action is “GotoTask”. And the data portion contains the name of my “main” contact agent script. In my example “Contact – Agent Script”.
Tip:
You could be more creative and have a third agent script. Maybe “New Contact Creation Agent Script”, something that helps the agent collect all of the details needed to create a new customer.

And finally another condition, this time I check that the contact.Id is blank. As it would be on a new customer. So “[[contact.Id]]”==””

Step Four – “Fire” contact verification script on load of contact.
I next added two actions to the “BrowserDocumentComplete” event for my contact hosted control. So that the correct agent script is loaded as soon as I open a contact.
So I added “Agent Scripting – Goto Task (Contact Script, new contact)” and “Agent Scripting – Goto Task (Contact Verification Agent Script”.
Because one action will fire for new contacts and one action will fire for existing contacts, only one of these actions will actually run each time a contact is loaded.

Step Five – “Fire” contact queries agent script on completion of the contact verification script.
So my final step was to trigger the “main” contact script after all of the verification answers have been passed. Lucky for us a “special” event on the agent script hosted control exists for this. Below you can see that I have added my action to the “AllAnswersVisited” event on my agent scripting hosted control.
When this action runs a variable “[[task]]” is available that will hold the name of the agent script that have just been completed. You may recall that we checked the name returned in in the condition used in the “Agent Scipting – GotoTake (Contact Agent Script, after verification)” action.

QUICK DEMO
To help explain how this change operates, below is a quick video of it in action. Enjoy!


Leave a comment