

I am creating blog posts covering all aspects of the MB2-712 certification. (Microsoft Dynamics CRM 2016 Customization and Configuration.) This time I will look at the concepts you’ll need to know connected with solutions. This is a pretty long post! But solutions are fundamental to customizing CRM so hopefully you will find it helpful.
Overview
Solutions in CRM are used to package and deploy customizations. Changes are grouped together as a solution, they can then be exported and transported from one environment to another.
The solution will include entities and their assets. The assets include Forms, Views, Charts, Fields, Keys, Relationships (1:N, N:1 and N:N), Messages, Business Rules, Hierarchy Settings and Dashboards. But solutions contain much more than “just” entities. Other options include Web Resources, Workflows, System Dashboards, Connection Roles, Security Roles, etc etc. I will discuss more on what can be included later. But for now, it is enough to understand that solutions can include A LOT of different types of components.
Components within a solution can include;
- Schema components, including entities, fields and relationships.
- Templates, including email templates, contract templates, KB article templates.
- Processes / Code components, including workflows, dialogs, business process flows, business rules, actions, plug-in assemblies, web resources etc.
- User Interface components, including forms, view charts, dashboards, site map and ribbons.
- Other components, such as security roles, field security profiles, connection roles etc.
Solutions can be unmanaged or managed. Often unmanaged solutions are used in development but as they are deployed (or re-deployed) to production environments managed solutions are used. Managed solutions can be created in-house but they may also be used when adding functionality into the CRM system provided by Microsoft (e.g. Field Service or Project Service Automation) or as ISV products. I will explain the differences in a second.
CRM 2016 also saw the introduction of patch management into solutions. Again I will look at that logic a little later.
It is best practice to always make changes using solutions as this keeps changes together and makes it possible to track who did what.
Publishers
When you create a solution it will always have a publisher, so let’s look at those before considering how to create a new solution. You will find the publishers option in the customizations area of CRM, under settings.

Why do we want a publisher? Well having a publisher(s) makes it easy to see which changes have been created by whom. As entities and fields are created their names will be prefixed to show who made the change.
A publisher might be an ISV or might be an internal team.
You will always have a default publisher; this could be used for internal development. Although personally, I like to avoid using this! I always create a publisher that reflects the project or organisation making the change. Out of the box the default publisher will prefix all newly created fields / entities with new_.
Below you can see I have created a new publisher called “Neil Parkhurst International”. The publisher name has been automatically derived from the display name.
Notice that I have set the prefix to npi. Below this we can see an example of what a new entity name might look like with this prefix. (npi_entity). Also notice that the Option Value Prefix is set to 90,000. I haven’t covered optionsets, yet! But each text item in the optionset has a numeric value. The options value prefix option can be used to decide how to default the values in optionsets for this publisher.
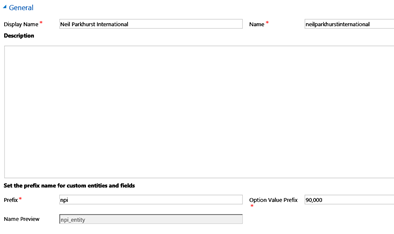
If you scroll down the publisher form a little you will see fields to enter contact details of the publisher. These are for reference only but quite useful when the publisher is a 3rd party.
Creating a Solution
When discussing publishers, I mentioned a concept of the default solution. The default solution can be found by looking directly in the customizations option. Meaning the default solution is the entire system.
Should you make changes directly in the default solution then the default publisher will be selected. Meaning all of your changes will be new_. (At least they will be if you don’t change the out of the box prefix.)
I must admit that when I first started using CRM I used to make all of my changes directly in the default solution. These days I don’t consider that good practice. Right from the get go I create a solution and then as I change / edit entities I add them to my solution. I do this for several reasons. One being that if I try to create a solution after the change is completed I sometimes find it hard to remember all of the components I have touched. But most importantly by creating your changes within the scope of a solution, with a publisher, all of your changes will be prefixed appropriately.

To create a solution, select the solutions option which is found in customizations under the settings area of CRM.

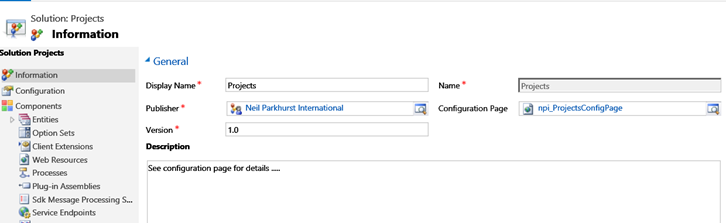
As I have already suggested, when I start a new “project” I like to create my solution as the FIRST thing I do before I start making any changes. Below you can see an example solution I have created called Projects.
Notice the Display Name and Name are mandatory fields. The Name field will default to the display name, with spaces removed. When you are creating a new solution you can change the name field. But once created the name field becomes read only.
I have already described the concept of publisher. When creating a solution the publisher is mandatory but will be initially populated with the details of the default publisher. You can see below how I have changed my publisher to “Neil Parkhurst International”.
The configuration page is an optional field. This is a link to a web resource that will be a component of the project. This can (optionally) be used to create a html page describing the content of the solution or maybe its release history. (Or anything you feel is important.) For small projects I tend not to create a configuration page and simply type this type of information into the description field. But on larger projects when I might require more information or expect to edit it overtime I always create a configuration page.
Version, this is a mandatory field. I have simply entered 1.0. But if you prefer a different style, maybe with major, minor and revision, then simply enter that instead. The version does not auto-increment as you make changes. But if you import a solution and a copy ready exists you will get a message warning message which will quote this version number.
The version number can be upto four numbers separated by decimals. (e.g. 2.1.0.440) Generally this is used to reflect a major.minor.build.revision format. But alternatively you could adopt other standards such as year.month.day.revision. You see the version number appended to the zip file name when you export the solution.
Tip: The version number also has implications when we consider patch management. As described later in this post.
Having created a solution, you will want to start adding components. Those components can be existing or new. And can be of “any” component type. Including entities, option sets, site map, web resources, processes etc etc.

If you add a new entity you will be prompted for its name and such like. But if you add an existing entity you will get a different dialog to allow the selection of all or specific assets. Below you can see I am adding the account entity into my solution. At this point I could select the Add All Assets option to simply add the entire entity. I often do that with custom entities, when I will know I have total control of that entity. Just as doing so is simple.
But when I add a system entity I like to select the specific views, charts or forms (etc) that have changed or are to be changes. As this reduces the chance of any conflicts with changes others may make.
Below you can see I have selected just one view on the account called “Accounts with Projects”

Exporting a Solution
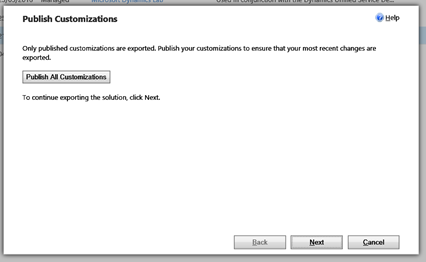
Exporting a solution is easy, simply select the solution and click the Export button. When you do this you will asked to publish the customizations. It is important to note that only published customizations will be exported. You will find a video demo at the end of this post, if you watch it carefully you may notice a spelling mistake on an account view I created! You may also notice that I skip the publish customizations option during the demo. I say this as I had already corrected this spelling mistake but skipping the publish meant my “bug” got deployed.
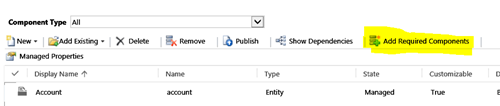
Next you may be prompted about missing required components. Check these warnings carefully as you might need to add more components into your solution before continuing. If you do need to go back to the solution and add missing components you will find a ribbon button that might help! (Add Required Components)
Within system settings there are a number of configuration items which can be bundled into your solution. Such as the settings to auto-numbering. If you have defined any of these, you can opt to include or exclude them in the next screen.

Next an important question, what package type do you required. Managed or unmanaged. I will discuss the differences and when to use each later in this post.

After a pause your solution will be saved. A solution file is simply a zip file that you can then move to another environment. The fact the solution is a zip file is useful as the files created are generally pretty small and therefore easy to ship around. Also these files can be stored meaning you have a reference of what was exported when.
Importing a Solution
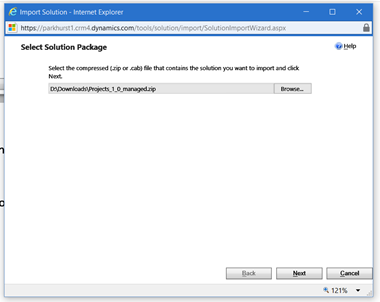
Having looked at how to export a solution the next logical step is to consider how it will be imported. Simply select the import option and browse for a solutions file.
Sometimes you might be prompted at this point! Say you are importing a new version of an existing solution you will get a prompt warning that you are going to replace version “1.0” (say) with version “1.1”. Check this information and click next to continue, assuming you are happy.
IF the solution new or unmanaged, you will simply progress to starting the import at this stage. Although you will get a friendly warning when importing an unmanaged solution as the changes cannot be uninstalled.
If the solution your importing is a upgrade to a managed solution you may have a decision to make! You will need to select “Maintain Customizations” or “Overwrite”. Maintain is the recommended option, so let’s consider that first. It is possible that someone else has made unmanaged changes in the environment you are about to alter. The maintain option will try to retain any existing unmanaged changes. If there is a conflicts an existing change it will be retained and the imported one not applied.
Overwrite however would do the reverse, it effectively forces an overwrite of the new solution.
When we are thinking about a production environment, if managed correctly this type of issue should never apply. As nobody would ever make uncontrolled changes direct on a live server. But unfortunately, that is just a theory! In the real world I have often found that support guys have “fixed” a few bugs direct on the live server outside of any reasonable controls.

Managed v Unmanaged Solutions
Some points about differences between managed and unmanaged solutions;
- The default solution is always an unmanaged solution. But the solutions you create can be managed to unmanaged.
- Unmanaged solutions can be changed.
- Unmanaged solutions cannot be removed.
- Unmanaged solutions can be exported as managed solutions.
- Deleting an unmanaged solution has no effect on the components it contains, the delete simply removes the solution.
- Managed solutions can be removed, a process that removed ths solution and its components.
- Managed solutions cannot be exported.
- When importing a managed solution, you can option to maintain or overwrite any unmanaged changes.
- Importing an unmanaged solution always overwrites.
Generally speaking, it is good practice to work with unmanaged solutions in development environments. As they can be changed. But as you progress into controlled environments for user acceptance testing and production then managed solutions are definitely the recommended approach.
Tip:
I think you should assume you will get questions about the differences between managed and unmanaged solutions!
Patch Management
CRM 2016 introduced a concept of patch management to help make applying revisions to existing solutions easier. One or more patches to a solution can be created from a solution and later rolled up (merged) back into the main solution.
Patches can be created from unmanaged solutions and applied to managed or unmanaged solutions. But unmanaged patches should not be used for production purposes.
Patches are only created from the parent solution. A parent solution can have multiple patches but a patch cannot have a patch. Each patch can only have one parent.
Because patches are dependent on the parent solution you can only import a patch if the parent is already present.
A patch version must always have the same major/minor version number as the parent solution. But the build / revision number must be higher. (e.g. A patch for a solution with a version set to 1.0 would be 1.0.1.0) If more than one patch is created subsequent patches will have a higher version. (So in the example just given a second patch to the parent solution 1.0 would become 1.0.2.0)
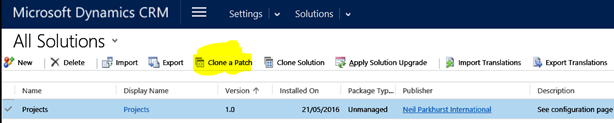
To create a patch, you select the parent solution and select the “Clone As Patch” option.
A dialog is then given to confirm the version number.

Exporting a patch is pretty much the same process as exporting a solution. As is importing them, expect they need to be imported in order. As it is not possible to import a patch with a lower version number than currently deployed.
At some point you will want to roll the patches up to me able to create a new major / minor version of a project. To do this you use the “Clone Solution” option. It will allow the creation of a new solution with an incremented major/minor version number. When this new solution is created the patches will no longer be seen in the list of solutions.

When a solution that was previously patches is imported you can see the solution and its description you will see that it is an upgrade of the original solution. At this point you can select the original solution and select the “Apply Solution Upgrade” option. This will combine the original solution, all the patches and the latest version into one final upgraded solution.

This might sound complicated but if you test patches you will find the process is actually pretty straight forward.
It is possible to delete and uninstall a managed parent solution. Doing so will uninstall the patches to the parent solution in reverse order. It is also possible to delete / uninstall an individual managed patch.
It is also possible to delete an unmanaged patch. But this will be simply removing the patch not the underlying changes to components.
To repeat:
It is not advised that unmanaged patches be applied to or removed from a production environment.
Demo
To help support this post I have also created a short video on how to create, export and import a solution. Hopefully you will find this useful.
As always please include plenty of hands-on time in your preparation! Hopefully this post has given you enough pointers for the MB2-712 certification. J


Leave a comment